- support@ for customer support inquiries
- billing@ for payment and invoice questions
- hello@ or info@ for general inquiries
- sales@ for sales conversations
- team@ for internal or partner communications
All of these can flow into the same Jelly inbox, and your team can reply from whichever address is appropriate for each conversation. This guide explains how to add and manage multiple addresses.
Understanding How Multiple Addresses Work
Before diving into the setup, it helps to understand how Jelly handles multiple addresses.
Receiving emails
All emails forwarded to your Jelly inbox (hello@your-team.sendtojelly.com) arrive in the same shared inbox, regardless of which original address they were sent to. If someone emails support@yourcompany.com and someone else emails billing@yourcompany.com, both conversations can appear happily together in Jelly.
For the kinds of teams Jelly is designed to help, this is usually what you want — your team can see and manage all incoming messages in one place. You can use labels and rules to organise messages automatically, but they’re all available to the team in the same inbox.
So: to receive emails at a new address, all you need to do is make sure that address forwards to Jelly.
Sending emails
Each address you want to reply from needs to be set up in Jelly. When you compose a reply (or a new message), you can choose which address to send from; Jelly automatically selects the address that matches the original message when possible.
Normal Jelly subscriptions let your team add up to three shared addresses. The Royal Jelly plan increases that to unlimited!
Adding an Address on a Domain You’ve Already Verified
This is the simplest scenario. If you’ve already gone through DNS verification for yourcompany.com (either during initial setup or when adding a previous address), you can add any address at that domain without repeating the verification.
Only admins and team owners can set up and edit email addresses.
How to add the address:
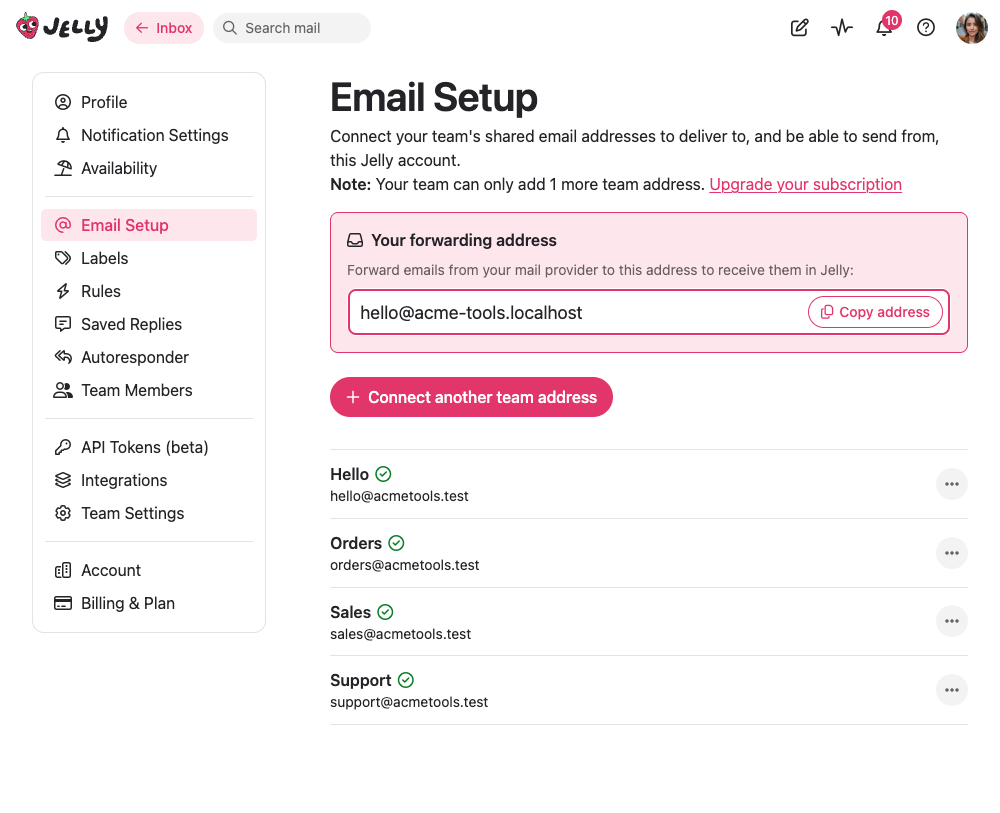
- In Jelly, go to Email Setup (profile photo → Email Setup)
- Click Connect a team address
- Enter the new address (e.g., billing@yourcompany.com)
- Jelly will recognise that the domain is already verified using DNS
- The address is immediately ready to use for sending
Don’t forget about forwarding
Adding a sending address doesn’t set up forwarding. If you want to receive emails at this new address in Jelly, you’ll also need to configure forwarding from your email provider.
For example, if you add billing@yourcompany.com for sending, you’ll also need to go to wherever billing@ is hosted (Gmail, Exchange, etc.) and set up forwarding to your Jelly address. If billing@ is just an alias that already delivers to a mailbox you’re forwarding, you might not need to do anything extra — the emails might already be arriving.
Adding Another Gmail Address
If you use Gmail, adding more addresses depends on whether they’re in the same Google account or different accounts.
Same Gmail Account (Aliases / “Send Mail As”)
Gmail lets you configure additional addresses as “Send mail as” aliases. If you’ve already connected a Gmail account to Jelly and want to use another address that’s configured as an alias in that same account:
- Go to Email Setup in Jelly
- Click Connect a team address
- Enter the alias address (e.g., billing@yourcompany.com) and a name for it (e.g. “Billing”)
- Jelly will detect that this email address is hosted with Google, and show that you already have a connected Gmail account
- Choose to link this address to your existing Gmail connection
- Jelly verifies that Gmail allows sending as this address
- Done — you can now send from both addresses using the same Gmail connection
This works because Gmail already knows that your account is authorised to send as that alias. Jelly just checks that the permission exists.
Different Gmail Account
If the new address belongs to a completely different Gmail account (a separate login), you’ll need to connect that account:
- Go to Email Setup
- Click Connect a team address
- Add the email address and your name
- Click Connect to Google
- Sign in with the other Google account
- Grant Jelly permission to send, as in the Gmail setup guide
Each Gmail account you connect is independent. You might end up with two or more connected Google accounts, each able to send from their respective addresses.
Remember forwarding: Each Gmail account needs its own forwarding configuration. Go to Gmail settings for each account and set up forwarding to your Jelly address.
Adding an Address on a Different Domain
If you need to send from an address on a domain you haven’t verified yet (say, you have yourcompany.com working and now need anotherbrand.com), you’ll go through the verification process for the new domain.
This is the same process you followed for your first domain:
- Go to Email Setup
- Click Connect a team address
- Enter the address on the new domain
- Choose Domain verification
- Add the DNS records Jelly provides (DKIM TXT record and return-path CNAME)
- Click Check verification… once the records are in place
Or, if you can’t access DNS for the new domain, you can use single-email verification as a fallback (with the “sent via” tradeoff).
Choosing Which Address to Send From
When you’re composing a reply or a new message in Jelly, you’ll see a dropdown or selector that lets you choose the “From” address.
For replies: Jelly automatically selects the address that matches where the original email was sent. If someone emailed billing@yourcompany.com, Jelly will default to replying from billing@yourcompany.com (assuming you have it configured). You can always change this manually.
For new conversations: When composing a new message (not a reply), you choose which address to send from. Pick the one that makes sense for the context.
What if the right address isn’t available? If you want to reply from an address that isn’t in the dropdown, you’ll need to add it in Email Setup first.
Who Can Manage Email Addresses?
Only team admins and owners can add, modify, or remove email addresses. Regular team members can see which addresses are available and choose between them when composing, but they can’t change the configuration.
If you’re a team member who needs a new address added, ask your team admin or owner to set it up.
Common Scenarios
“I want all our team addresses to come into one inbox”
This is the standard Jelly setup. All addresses forward to your single Jelly forwarding address (hello@your-team.sendtojelly.com), and everything appears in one shared inbox. Add each address you want to send from in Email Setup.
“I want to sort emails by which address they were sent to”
You can use labels and rules for this. Create a rule that applies a “Billing” label to any email sent to billing@yourcompany.com, and another rule for support@ emails, etc. Then you can filter your inbox view by label.
“I have a catch-all address”
If your email provider is configured to accept email sent to any address at your domain (anything@yourcompany.com all goes to one place), and you forward that to Jelly, you’ll receive everything in Jelly automatically. You’ll just need to add the specific addresses you want to send from.
“I need to use a personal email address sometimes”
You can add personal addresses (like a Gmail) to Jelly alongside your team addresses. Just connect the account or verify the address as described above. Be thoughtful about when you use personal addresses for team communications, though — it can confuse customers if they’re sometimes talking to support@ and sometimes to james.smith@gmail.com.
Troubleshooting
“The address I want isn’t appearing in the ‘From’ dropdown”
The address needs to be set up in Email Setup before it’s available for sending. Go to Email Setup and add it. All verification steps also need to be completed – if Jelly hasn’t been able to verify your DNS setup, for example, the address won’t be available to send from.
“I added an address but I’m not receiving emails”
Adding a sending address doesn’t set up forwarding. Make sure the new address is forwarding to Jelly (either directly, or through a mailbox that forwards).
“I added another Gmail address, but messages I send from that address have the wrong From address”
If you try to send using Gmail with a From address that the Gmail account is not configured to send as, Gmail will silently change the From address to the default of that account.
Jelly tries to verify that your Gmail account can send as a particular address so it can warn about this situation; if you’re seeing this behaviour, the address might not be configured as a “Send mail as” alias in Gmail. Check Gmail settings → Accounts and Import → “Send mail as” section to see which aliases are configured.
“I get an error when adding a new address”
- If it’s a domain you’ve already verified, make sure you’re entering the address correctly
- If it’s a new domain, you’ll need to go through domain verification (or single-email verification)
- For Gmail addresses, try disconnecting and reconnecting your Google account
- Please get in touch with any other issues and we’ll do our best to help you out!